关于#
Glances - An Eye on your system
Glances is a cross-platform monitoring tool which aims to present a large amount of monitoring information through a curses or Web based interface. The information dynamically adapts depending on the size of the user interface.
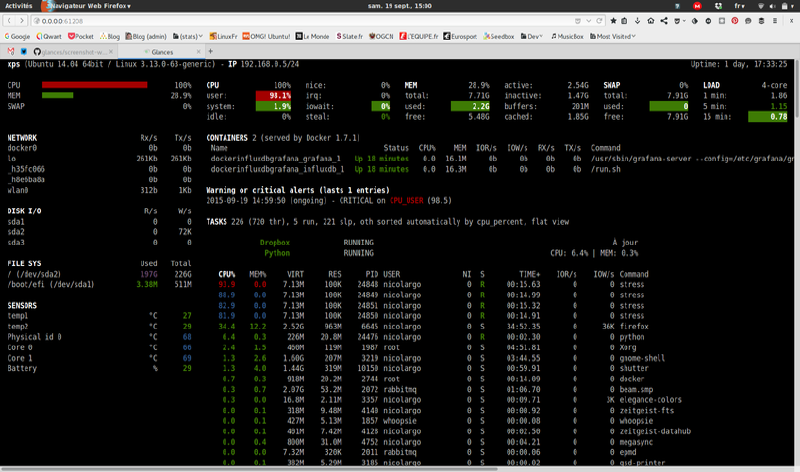
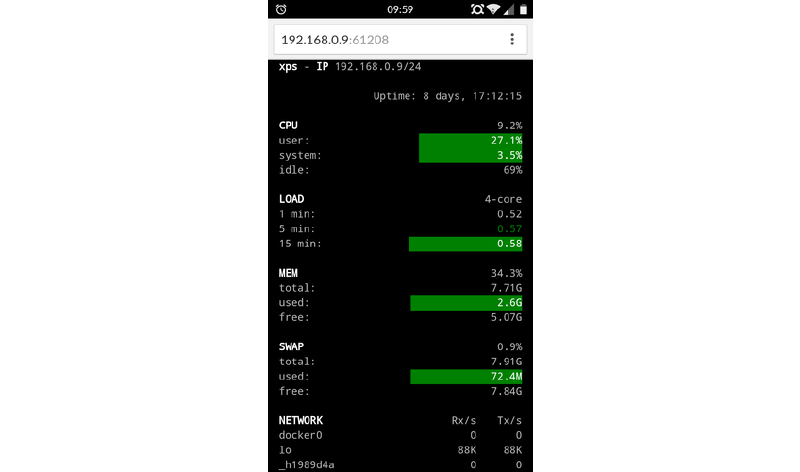
我的需求是在一个 Web 界面能够看到服务器实时资源占用情况,目前只能登录腾讯云控制台在监控页面查看。
下面以 Glances 当前最新版本 3.2.7 演示在 Ubuntu Server 20.04 LTS (Python 3.8) 上的安装和部署过程。
安装#
首先,请检查你的 Python 版本应满足python>=2.7 or python>=3.4,否则请参照nicolargo/glances: requirements - Github选用较早版本的 Glances 安装。
Note for Python 2.6 users Glances no longer supports Python 2.6. Please upgrade to a minimum Python version of 2.7/3.4+ or downgrade to Glances 2.6.2 (last version with Python 2.6 support).
# 安装psutil
pip install psutil
# 安装Glances(Web Server Mode)
pip install --user 'glances[web]'
# 启动glances(Web Server Mode)
glances -w查看#
打开 http://#{server_ip}:61208 查看 Glances 页面,用你的域名或服务器 IP 地址替换 URL 中的 #{server_ip}。
以本站为例,即yellow13441.cn:61208。
进阶#
除了监控的基础功能以外,我还有以下两个需求:
更优雅的访问路径
使用用户名密码限制访问
更优雅的访问路径#
通过yellow13441.cn:61208访问过于丑陋,我想通过yellow13441.cn/monitor或monitor.yellow13441.cn访问。
踩了若干坑后的正确思路如下:
先配置域名解析服务使monitor.yellow13441.cn能正确解析到http://yellow13441.cn:61208;
再配置 Nginx 将https://www.yellow13441.cn/monitor请求重定向至https://monitor.yellow13441.cn。
配置域名解析服务#
以腾讯云服务器为例,在腾讯云-控制台中打开域名解析配置界面,添加如下记录。

记录类型处选择隐性URL,记录值填写http://yellow13441.cn:61208,有关显/隐性URL的介绍如下:
显性URL:从一个地址301重定向到另一个地址的时候,就需要添加显性URL记录。
隐性URL:类似于显性URL,区别在于隐性URL不会改变地址栏中的域名。
待 DNS 配置生效后,打开monitor.yellow13441.cn查看是否跳转到 Glances 页面。
配置 Nginx#
打开 nginx.conf,在合适的 server block 中添加location /monitor {}代码段
server {
  listen 443 ssl;
  server_name www.yellow13441.cn;
  location /monitor {
    return 301 http://monitor.yellow13441.cn;
  }
}
nginx.conf
使用用户名密码限制访问#
若 Glances 已在前台启动,则需按 CTRL + C 终止进程。
若 Glances 进程在后台执行,可通过 ps aux | grep glances |awk '{print $2}' | xargs kill -9结束进程。
# 按提示设置用户名和密码
glances --username --password -w
Define the Glances webserver username: foo
Define the Glances webserver password (foo username): bar
Password (confirm): bar
Do you want to save the password? [Yes/No]: Yes
# 先按CTRL + C 终止进程,再执行下面命令
nohup glances -u foo -w 1>/dev/null 2>&1 &
# nohup 确保当前 shell 退出后进程保持执行
# -u 指定用于密码验证的用户名
# -w 指定 Web Server Mode
# 1>/dev/null 2>&1 丢弃 nohup 的标准输出流和标准错误流
#   详见 Linux 输入输出重定向(https://www.runoob.com/linux/linux-shell-io-redirections.html)
# 结尾的 & 将命令在(background)后台执行,可通过 Jobs 命令查看当前 shell 下的任务
# 也可通过 fg 命令从 background 栈中取出一个任务到 foreground参考#
致谢#
特别感谢我司SHEIN提供的工作环境,我才能全身心投入本文章的写作。